
Manual
Based on Version 0.2.05a
Forword
Please keep in mind that you are playing a verly early Alpha version. Focus has been on the engine, the web service, the validation of game rules and not on the user interface. This means that I’ve tried to graphically display everything of importance at least in one way, but not necessarily in the most convenient way. Also, the various Inspectors and the console are not resizeable currently.
Those shortcomings will be addressed soon though. Also, even though my goal is to attract players that are not familier with the original board game, currently it might be very hard for someone who’s not familiar with the terms and concepts of the original ASL to play the game. But I will definitely try to improve on this in the future in order to attract new players.
Quick start
User interface
Play Match
Hotseat
LAN
Online
Saving Matches
General game play
Player Turn Phases
Scenario Description and Victory Conditions
Commands per Phase
Navigating the map, key commands
How to issue commands
Line of Sight
Close Combat Inspector
Events
Concealment
Console
Scenario logs
Chat
Elo rating
Quick start
For those too impatient to read on this is how to quickly enter game play:
- Download, install and run the latest version of WW2T
- Click on Play Match -> Hotseat
- Select match “Rattenkrieg” from the list of pre-defined matches and click on Load
- Switch between both sides with the Tab key and start playing
Everybody else… please read on 🙂
User interface
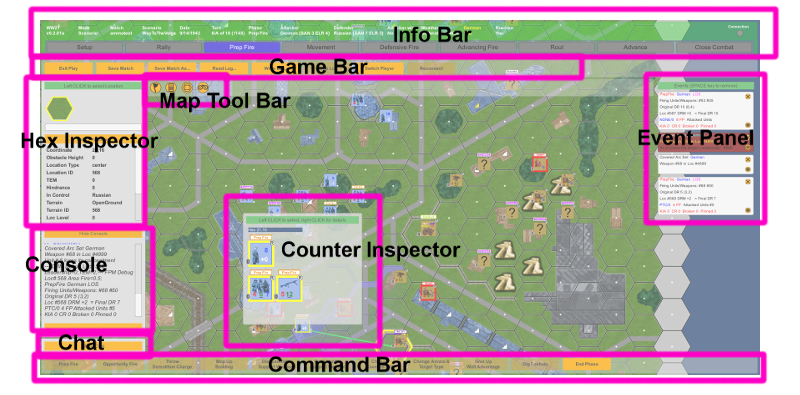
When in play mode the user interface (UI) consists of the following elements.
- The Info Bar informs you about the scenario played, the current turn and phase and whether we are in the Attacker or Phase half turn. Attacker and Defender nationalities and players are listed as well as the Sniper Activation Numbers (SAN) and Experience Level Rating (ELR) for this scenario. For a LAN or Online match you’ll see the connection status in the right corner (green for both players connected, yellow alerts you that your opponent is currently not connected, red means that you are not connected). In the lower part of the Info Bar you’ll see depicted in which phase the game is currently.
- The Game Bar contains non game play related mechanics, for example to save the match, read or write a log file or to reconnect in case of a lost network connection.
- The Counter Inspector will come up when hovering over counters in the map. Select them with a Left click (or Shift-Left in order to combine units from differen locations) or further inspect their properties and events with a Right click.
- The Command Bar is where all your tactical decisions are made. It contains all available command for a particular situation in the match. Each phase comes with a standard set of commands generally available. Whenever blocking events occur (red events in the Event panel) the commands will change to reflect actions during that particular situation. Most importantly: Hover over all buttons to read the tooltips, they contain vital information about all commands and also inform you what to do in order to issue the command.
- The Event Panel displays events that occur during game play. For example the outcome of a Fire Attack is displayed here. Or the expenditure of Movement Factors which will hand over game play to your opponent every time. Click on the x button to remove an event (or hit the Space bar to remove the uppermost event) or click on the eye symbol to center the map on the location where the event happened. Read more about events here.
- The Hex Inspector will display all locations of a hex (for example upper building level locations) and the properties of the selected location. Click on one of the locations (depicted in hex shape) which represent different locations in that hex in order to select it for example when you want to move units to the first floor of a building. Shift-click in order to select more than one location. Click on Show/Hide Properties in order to further inspect hexes and their locations.
- The Map Tool Bar contains several map or scenario related commands. For example you can display hexes related to victory conditions, read the scenario description or hide all counters temporarily on the map. Check their tooltips for keyboard shortcuts.
- The Console is currently only needed for debugging purposes and the means to create scenarios. Click on Show/Hide Console in order to expand/shrink the view.
- The Chat window allows you to communicated with your opponent via text messages during game play. Click on Show/Hide Chat in order to expand/shrink the view.
Play Match
Choose between 3 playmodes
- Hotseat (play against another player or yourself on the same computer)
- LAN (play against another player in your LAN)
- Online (play over the Internet and connect through the WW2T web service)
Hotseat
If you are using WW2T for the first time you probably have to create a match first. Click Create and type in a “Match name”, then hit the Select Scenario button to select a Scenario for the match and finally choose your role (Attacker, Defender), the grey button is the selected choice. Click on Create Match to save your match.
To play a match, click on the match in the list and then Load or Load from Autosave to enter play mode. See below on how to save a match.
While playing a hotseat match you can switch between the two sides via the Switch Player button (or TAB key). In Hotseat mode you can pass for your opponent on certain actions (for example on MF expedenditure in the Movement Phase) without having to switch to the other play and press Pass for him (P key).
LAN
Both players need to to be in the same Local Area Network (LAN), preferably connected to the same (WiFi-)Router. One player starts a scenario by clicking on LAN (Host) and selecting a scenario from the list of scenarios. The host also determines whether he will play the Attacker or Defender side in that scenario. The other player clicks on LAN (Client) and waits until the scenario is started by the host.
Online
The matchmaking for online matches goes through the WW2T web service. After two players have agreed on playing a certain scenario they connect via the web service but game play will then be performed P2P. After a scenario has been finished (in one or several online sessions) the result is submitted back to the web service and your Elo rating will be updated.
Register a new user or login with an existing account to the web service. Registration requires a user name, password and email address. The password is server side encrypted. Connections to the web service are SSL encrypted. You will receive an email with a verification link you have to click on in order to be able to login for the first time.
After login you see a list of matches you take part in either as Host or Guest. Host is the player that published the match request. Guest is the player that applied and has been accepted by the Host. Hit My Matches to get back to this list.
All Matches lists those matches where matchmaking has yet not been finished, i.e. where the Host still hasn’t chosen the Guest. Your newly created matches will be listed here. Scroll through the list to find open matches. Click on the list to see the match details. If you see a match of interest hit Apply to Match in order to apply as the opponent. To see all of your applications hit the My Applications button. You can also search for a particular match ID, host player or scenario name in order to filter the list.
From the match detail page you can also list all applications of other players that have applied to one of your matches (List applications). Selecting an application from a list of applications lets you either revoke an application you’ve posted OR accept or deny an application of someone else to one of your matches.
To create a match, click on Create new match. You have to choose a scenario with Select scenario and decide whether the scenario will be rated after finishing it. Also select the role you will play (Attacker or Defender). As the creater of a match you are always the Host.
Finally, from the match detail page you can start game play. Prerequesite is that the Host has accepted one of the applictions and the match therefore lists a Guest player. The Host has the following options:
- Host Match (last Save): Standard way to start game play for the host, loads scenario from last Save point or at match start.
- Host Match (last Autosave): Load match from last autosave which happen at the start of every phase.
- Host Match (sync from Guest): Be careful with this one. It allows you to receive the scenario state from the Guest. This could either be useful if you don’t have the scenario on your computer OR if you have dropped out of the match and your opponent is still online and in the match. You can re-enter it by using this function.
The Guest can choose between:
- Join Match: Standard way to start game play for the Guest
- Join Match (Sync from Host): Be careful with this one. It allows you to receive the scenario state from the Host. This could either be useful if you don’t have the scenario on your computer OR if you have dropped out of the match and your opponent is still online and in the match. You can re-enter it by using this function.
From the match detail page you can also submit the result of a match (Submit result). This is only then required if the automatic submittal of the result at match end fails (because of connection problems for example). Both players have to submit the same outcome of course in order for this match to be finished and rated (if applicable).
Saving matches
After each phase change an autosave file of the scenario played is automatically created in the folder
your installation directory/WW2T_Data/fileassets/autosave
Press the Save Match button to save at anytime. In LAN or Online games only the host player can save the match. Press the Save Match As… button to create a copy of match and scenario with the name provided by you.
The last autosaved scenario and last saved scenario (if saved) for each Hotseat or LAN match are referenced in the match file. Match files reside under
your installation directory/WW2T_Data/fileassets/matches
Online games do not provide a match file on your local hard disk. The information is stored in the webservice instead.
A scenario filename is made up of the following components:
MatchName_ScenarioName_Turn_Phase_AttackerOrDefender_CommandIndex
The higher the command index number the more recent is the saved scenario. For online matches the MatchName just consists of the match ID. AttackerOrDefender is either “a” or “d”.
Scenario files are currently not encrypted. This will happen in the future in order to avoid cheating. I rather have the plain text xml files at hand which makes bug hunting much easier.
Watch the console for any error messages displayed.
General game play
Once a scenario has been loaded the game will be in a certain turn and phase. Have a look at the Info Bar at the top. It will also inform you which Player side you are playing (the nationality of the troops) as well as who is currently the Attacker or Defender. Below the Infobar is the Game Bar which provides buttons to save a match (see here), read and write log files (see below) and buttons to
- Exit Play (leave game play)
- Switch Player (only available in Hotseat play mode)
The general sequence of play consists of a number of turns which are played by each opponent in 8 phases. First time the Attacker has the initiative and plays his role during those 8 phases, afterwards the previous Defender becomes the Attacker and the 8 phases are played again this time the initiative lies with the other player.
Player turn phases
- Setup (Both players: Inspect Order of Battle and setup Units and Snipers, only once)
- Rally (Both players: Rally Units and perform certain actions)
- Prep Fire (Attacker: Fire Units that won’t move in Movement phase)
- Movement (Attacker: Move Units that have not Prep Fired, Defender: First Fire at moving Units)
- Defensive Fire (Defender: Final Fire at all enemy Units)
- Advancing Fire (Attacker: Fire with Units that have moved)
- Rout (Both players: Rout broken Units)
- Advance (Attacker: Move one hex with Units even into enemy hex)
- Close Combat (Both: Perform Close Combat attacks and Melees in hexes with Units of both players)
Usually game play commences with a dedicated Setup phase before the first Rally phase in which both players can setup their Units and freely re-assign any Support Weapons in possession. Before setup begins both player have the opportunity to inspect the order of battle for the scenario, i.e. have a look at all friendly and enemy Units and their strengths. Once both players have issued the End Inspection command they will have limited intelligence on the enemy according to Concealment rules. The locations a Unit can actually setup are limited to its dedicated Setup Area (hexes/locations marked with blue overlay after you have selected a Unit). In a scenario with a Sniper Activation Number (SAN) greater or equal 2 you have to setup your Sniper counter. The appropriate hexes are highlighted once the Sniper has been selected. Be aware that ALL enemy units are temporarily concealed for Sniper placement.
A phase ends whenever the participating players hit the End Phase button. Phases where both players are allowed to act need to be ended by both players (i.e. Rally), phases where only one player is allowed to act end when this player ends the phase (i.e. Prep Fire).
If your action is required the Infobar at the screen top turns green and you will hear a sound. If you are currently not the active player the Infobar will be colored in red. Blocking events (colored in red) can suddenly switch the active player and interrupt normal game play.
Scenario description and victory conditions
Access the scenario description via the Map Toolbar. Victory Conditions (VC) exist for all five scenarios currently shipped with WW2T. You can access them via the Map bar and since all scenarios have VCs related to the control of buildings/hexes you can get a visual clue by pressing the V key which buildings are part of it. Also see the Hex Inspector which displays the actual control status of a particular location (see section Hex Inspector). At the end of a match a dialog will inform you about the outcome and the result is submitted to the web service for Online matches). Your Elo rating will be updated in case you have finished a rated match.
Commands per phase
Various Phases
- End Phase End phase for your player
Setup Phase
- End Inspection [Event based] End the initial inspection of the Order of Battle. From now on Fog of War rules will be applied.
- Setup Unit [Event based] Setup a unit in a differen location. This is limited to the Setup Area of a unit (highlighted in the map).
- Setup Assign Support Weapon [Event based] Assign a Support Weapon to a unit or transfer one between units.
- (Un-)Conceal Unit [Event based] Conceal or unconceal a unit if its Setup Area provides Concealment Points.
- (Un-)hideUnit [Event based] Hide or unhide a unit if its Setup Area provides Hidden Initial Placement (HIP) Points.
- Create Dummy Unit [Event based] Create a Dummy unit at the cost of 1 Concealment Point if the Setup Area for that location provides Concealment Points
- Remove Dummy Unit [Event based] Remove a Dummy unit and regain 1 Concealment Point
- Disassemble Support Weapon [Event based] Disassemble a Support Weapon to reduce its portage points and to make it easier to carry it around. Portage points are halfed (fractions rounded up). Weapon can longer fire (except German Medium and Heavy Machine Guns fire as Light Machine Guns)
- Reassemble Support Weapon [Event based] Reassemble a disassembled Support Weapon
- Use Wall Advantage [Event based] Declare that a unit in a hex with hedge or wall hex sides uses Wall Advantage
- Give Up Wall Advantage [Event based] Declare that a unit in a hex with hedge or wall hex sides gives up Wall Advantage
- Setup In Crest Position [Event based] Declare that a unit in a gully/depression hex goes into Crest position. Setup the unit to another location in order to give up Crest status.
- Setup Entrenched [Event based] Setup unit entrenched in a location containing entrenchment (Foxhole, Trench)
- Place Trench [Event based] Place a trench into a selected location if trench points are available
- Remove Trench [Event based] Remove a trench in order to regain a trench point
- Change Gun Covered Arc [Event based] Change a gun’s Covered Arc at scenario start
- Place Sniper [Event based] Place your Sniper to a location highlighted in the map.
- Commit Sniper [Event based] Commit your Sniper placement
- Commit Setup [Event based] Commit your setup
Rally Phase
- Recover Support Weapon Recover and collect an unpossessed Support Weapon (including an enemy one)
- Transfer Support Weapon Transfer a Support Weapon between Units in the same Location
- Repair Support Weapon Repair a malfunctioned Support Weapon
- Self Rally Rally a broken Unit that is capable of self rally. This is either a Leader or one Squad/Half Squad of the current Attacker (!) that is not in a Location with a Good Order Leader
- Rally Rally a broken Unit with the help of a Leader in the same Location
- Deploy Squad Deploy a Squad into two Half Squads with the help of a Leader in the same Location
- Recombine Half Squad Recombine two Half Squads into one Squad with the help of a Leader in the same Location
- Setup Unit Setup Offboard Units that will enter this turn in their Setup Area
- Setup Assign Support Weapon Assign a Support Weapon between Offboard Units that will enter this turn
- Use Wall Advantage Declare that a unit in a hex with hedge or wall hex sides uses Wall Advantage
- Give Up Wall Advantage Declare that a unit in a hex with hedge or wall hex sides gives up its Wall Advantage
- Name Unit A dialog asks for the unit’s name. It will be displayed below the unit in the map and inspectors.
- Capitulate If you see no chance of winning the match you can offer capitulation to your opponent. Your opponent will be asked and has to confirm your capitulation.
Prep Fire Phase
- Prep Fire Fire at enemy Units with full firepower
- Opportunity Fire Mark Units to fire later in the Advancing Fire phase without the malus applied to moving Units (i.e. like a Prep Firer)
- Throw Demolition Charge Throw a Demolition Charge at enemy Units
- Mop Up Building Reveal hidden enemy Units in a building, gain control of building if no enemy Units remain
- Disassemble Support Weapon See Setup Phase
- Reassemble Support Weapon See Setup Phase
- Change Covered Arc Change a gun’s Covered Arc
- Change Ammo & Target Type Change and configure the Ammunition and Target Type of a gun for its next shot
- Give Up Wall Advantage Give up Wall Advantage for a unit. Inherent hex TEM will be used instead.
- Dig Foxhole Dig a foxhole entrenchment
Movement Phase
- Move Move your Units to an adjacent Location
- Bypass A normal Move that allows you to bypass Buildings or Woods on their Open Ground hexsides. You can select 1, 2 or 3 hexsides at once. Bypassing along 3 hexsides will cost 2 MF
- Street Dash A special Move that reduces your chance of taking damage while crossing a street. Select an adjacent street Location and a connecting Location on the other side of the road. If the moving Unit is not in LOS or not in Open Ground on its starting hex and the dash target hex any Firepower of attacking Units firing at the dashing Units in the middle street Location will be halfed
- Declare Assault Move Declare the next move to be an assault move. This way a unit moves slowly and at maximum one location. Avoids the Non-Assault-Movment DR modifier. Units will end their move afterwards. Can be combined with certain activities like placing smoke. Perform actual Move after declaration.
- Declare Double Time Declare the following moves to be at double time. If given prior to any move a Unit will gain 2 additional MF. Otherwise it will gain 1 additional MF. Unit becomes Exhausted. Perform Move after declaration.
- Declare Crest Move Declare the following move to go into crest position. Unit must be in a gully
- Declare Entrenchment Move Declare the next move to be a move into an entrenchment. Perform actual Move after declaration.
- Drop Weapon Drop a weapon. The weapon becomes unpossessed.
- Recover Weapon Recover an unpossessed weapon at a cost of 1 MF
- Place Demolition Charge Place a DC on an adjacent Location at the MF it would cost to enter that Location. If the operation succeeds the DC can be Resolved in the Advancing Fire Phase
- Search Search at a cost of 1 MF your own and/or adjacent hexes so that enemy Concealed Units become revealed, enemy Hidden Units become Concealed and enemy Dummy Units are removed
- Place Smoke Place a Smoke Grenade in your own (1 MF) or an adjacent (2 MF) Location.
- Use Wall Advantage Declare that a unit in a hex with hedge or wall hex sides uses Wall Advantage
- Give Up Wall Advantage Give up Wall Advantage for a unit. Inherent hex TEM will be used instead
- Push Gun Push a gun into an adjacent location
Defensive Fire Phase
- Final Fire Fire Units that have not First Fired yet (similar to Attackers Prep Fire) or fire Units with First Fire flag at adjacent locations with halfed Firepower
- Throw Demolition Charge Throw a Demolition Charge at an adjacent location. The throwers location will also be attacked by the blast!
- Disassemble Support Weapon See command in Prep Fire Phase
- Reassemble Support Weapon See command in Prep Fire Phase
- Change Covered Arc Change a gun’s Covered Arc
- Change Ammo & Target Type Change and configure the Ammunition and Target Type of a gun for its next shot
- Give Up Wall Advantage Give up Wall Advantage for a unit. Inherent hex TEM will be used instead
Advancing Fire Phase
- Advance Fire Fire those units that have not Prep Fired yet (i.e. those that have moved) with half of their Firepower. Units with Assault Fire capability get a bonus.
- Resolve Placed Demolition Charge Resolve a Demolition Charge that has been Placed properly in the Movement Phase
- Throw Demolition Charge See command in Defensive Fire Phase
- Change Covered Arc Change a gun’s Covered Arc
- Change Ammo & Target Type Change and configure the Ammunition and Target Type of a gun for its next shot
- Give Up Wall Advantage Give up Wall Advantage for a unit. Inherent hex TEM will be used instead
- Declare Crest Move Declare the following move to go into crest position. Unit must be in a gully
Rout Phase
- Rout [Event based] Rout a unit that can (orange corners) or must (red corners) rout. Once the unit is selected the valid rout paths are shown in the map. A unit that routs into Open Ground in the Line of Sight of an enemy unit will be interdicted. Units have 6 MF for routing purposes. Units will have to rout away from enemies and to the closest Woods or Building hex. You can rout an unbroken leader together with the routing unit.
- Crawl [Event based] In order to avoid Interdiction a unit can chose to Crawl just into an adjacent location if no Woods or Building hex is nearby.
- End Rout Of Unit [Event based] End the rout move of an unit. You will be warned if this would result in the elimination of that unit
- Break Sometimes you want to move units with the routing units that are not broken You can break them voluntarily in order to make that possible.
Advance Phase
- Advance Advance into an adjacent location even one containing enemy units
- Transfer Support Weapon Transfer a Support Weapon from one unit to another
- Use Wall Advantage Declare that a unit in a hex with hedge or wall hex sides uses Wall Advantage
- Give Up Wall Advantage Give up Wall Advantage for a unit. Inherent hex TEM will be used instead
Close Combat Phase
- Don’t Withdraw from Ambush [Event based] Decide not to withdraw from Ambush
- Withdraw From Ambush [Event based] Withdraw units from Close Combat where you have the Ambush advantage
- Lock Leader [Event based] Assign and lock a leader to any accompanying Squad or Half Squad (drag&drop the leader on another counter) or let him fight on his own and then commit this assignment
- Withdraw from Melee [Event based] Declare unit to withdraw from Melee (not Close Combat!). Broken units must be declared as such. Those units will not participate in the attacks and will be withdrawn only after Close Combat has been resolved.
- Commit Close Combat [Event based] Group your units and enemy units to your liking in order to gain favourable odds. Once this is done commit your attack.
Purely event based commands (may come up in various situations and phases):
Sniper attack
- Forfeit & Place Sniper Forfeit your sniper attack and place the sniper onto one of the highlight hexes
- Target Sniper Execute your sniper attack
Sniper check
- Skip Check Do not check the enemy sniper
- Check Sniper Check the enemy sniper and try to reduce your opponent’s SAN number. Units become Temporarily Immobilized
Reveal Unit
- Skip Reveal Don’t reveal any of your units and therefore do not unconceal an enemy unit
- Reveal Unit Temporarily reveal one of your units in order to unconceal an enemy unit. Your unit will remain concealed but is disclosed to your enemy
Abandon Support Weapon
- Abandon Support Weapon Under certain circumstances your units must drop support weapons in excess of their portage capacity. Select those SWs to drop
Capitulation
- Don’t Accept Capitulation Your opponent has offered you his capitulation. Refuse to accept it
- Accept Capitulation Your opponent has offered you his capitulation. Accept it and win the match
Acquire Moving Target
- Follow Target If an target acquired by one of your guns moves away you can decide to follow it (keep aiming at it) to its new location
- Keep Current Target Don’t change your target acquisition
MF Expenditure
- Pass Hand over initiative to your opponent
- Defensive First Fire Fire at the moving stack. You can shoot as often as those units have spent MF for their last move. If your Line Of Sight is unobstructed you will receive the advantageous modifier of -1 (First Fire Movement in Open Ground). If the enemy units did not use Assault Move you will receive the advantageous modifier of -1 (First Fire Non-Assault Movement). Those units that have a First Fire flag already shoot as Subsequent First Fire and half firepower. Those units with Final Fire flag shoot as Final Protective Fire and must undergo a Morale Check themselves after the attack
- Declare Fire Lane Declare a Fire Lane to be laid by a Machine Gun in conjunction with the next Defensive First Fire attack along the Line Of Sight.
- Throw Demolition Charge Throw a Demolition Charge at enemy Units
- Change Ammo & Target Type Change and configure the Ammunition and Target Type of a gun for its next shot
Navigating the map, key commands
Use the WASD keys to scroll the map in all 4 directions. Use Y/Z and X keys to zoom in and out. Alternatively you can right-click with your mouse on the map and drag it into any direction. Use the mouse scroll wheel for zoom.
Use the H key to show/hide all player counters and to get an unobstructed view on the map board.
Use the V key to show/hide all hexes related to victory conditions.
Use the F key to switch on/off follow mode which will move your map according to actions taken by your opponent.
Use the Space bar to remove the topmost event from the event list.
Use the P key to pass if required (and the appropriated Button is also available). In Hotseat mode you can Pass for your opponent (only if he agrees of course or you are playing against yourself) with the same key.
Use the M key to show the moving stack only during Movement Phase.
Use the J key to center the map on the location of the last event.
Use the TAB key to switch between players in a hotseat match.
Use the ESC key to deselect all your selections (Units, Locations, Setup Areas) at once
How to issue commands
In almost all cases commands are issued by selecting one or more Units and/or a Hex/Location. Click with your mouse on a unit in the map to inspect (right click) or inspect AND select (left click) your or enemy forces. On the left hand side you can see the contents of the stack in the Counter inspector. You can select and deselect individual Units or Weapons there. Select Units from more than one Location by Shift-Clicking additional Units in the map. This is also one way to shoot on your opponent. First, select your Units, then Shift-Click the enemy Units you would like to shoot at. Alternatively you can simply click on the Location to shoot at (all Units in that Location will be selected for the Fire Attack). When selecting 2 Locations the Fire Attack will require all Units to be capable of Spraying Fire. Both parties are displayed in the Counter Inspector, switch between the opposing forces with the “Attacker” and “Defender” buttons above the listed Units. The Counter Inspector also displays a bunch of properties for the selected Units/Weapons in its lower.
If you have selected a Hex, information about it and its Locations are displayed in the Hex Inspector on the upper right hand side. It will display a hex shaped icon for each location in the selected hex. Left-click on those in order to select for example an upper building level location. Below is given some information about the location and its terrain. You can also check which player currently controlls a particular location. Shift-Click additional hexes to the first one selected (currently only required in Map Editor and Scenario Editor, not during game play).
In certain situations it might be required to select a particular hexside or vertex of a hex (i.e. when Bypassing or shooting at a bypassing unit). For this first select a hex (so it is highlighted yellow). Then your mouse cursor will highlight hexsides and vertices of this particular hex when you hover over them. Left-click on one of them to select/deselect an/or select/deselect more than one with Shift-left-click. They will be marked with white color.
A special situation occurs during the Setup Phase while setting up Dummy Units. In order to place them on the map you have to select a hex inside a valid Setup Area (with sufficient Concealment points) AND select the Setup Area because there can be more than one Setup Area defined for the same hex. The Setup Area is selected in the Hex Inspector with a button (arrow pointing down).
If a command becomes available in the Command Bar at the bottom of the screen the button will be activated (becomes orange). Hover over a button to see a tooltip. The tooltip will inform you either why you cannot issue this particular command or what else needs to be done/selected in order to to so. If the command has become available it will give you a brief information about the parameters. For example: You opponent has moved in his Movement phase, it is up to you now to First Fire at him. Select one of your Units and hover over the First Fire button. It will tell you your Firepower (FP), any Dice Roll Modifier (DRM) and so on (be aware that in case of a Fire Attack the tooltip will not reveal any modifiers related to the LOS upfront because it is not know to the firer yet. This means that the tooltip might deviate from what the actual calculation of the Fire Attack result will be).
Currently only one phase deviates from the selection pardigm, the Close Combat phase. After you have selected a Close Combat location (Units are highlighted in dark orange) you will see the Close Combat inspector. See below for further advice on how to configure your Close Combat attacks.
Line of Sight
The Line of Sight (LOS) is not displayed prior to any Fire Attack. It is up to you to decide whether Units have a valid LOS to their target. If not all attacking Units have a LOS the Fire Attack result in the console will inform you about it and the attack will be performed without those Units adding any FP to it. The LOS of the last Fire Attack is also displayed visually in the map. An unobstructed LOS is displayed in green color, from the first hindrance crossed in yellow color and from the first blocking obstacle in red color.
LOS calculation now includes blind hexes but they are not visually depicted.
Close Combat Inspector
The Close Combat phase deviates from the usual pattern on how to select Units and give commands. If a Close Combat exists in the map the affected Units are marked with an orange highlight. Click on the location those units are in and the the Close Combat Inspector comes up. A player can freely re-arragange his own Units and those of his opponent in order to attack any or some or even none enemy Units. Switch between Attacker and Defender setup to see how your opponent has arragend his attack groups.
While in your own setup view drag&drop a Unit into a new line in order to create a new Close Combat Group. The FP ratio an attack is based on is displayed in the center column together with a button to completely disable any attacks for this group. Single Man Counters/Leaders can be assigned to a Squad or Half Squad by dragging them on such a Unit. They can then not be singled out and be attacked on their own.
The order is as follows: First it is determined if one side ambushes the other. Should that be case the player with the ambush advantage has to decide whether he wants to withdraw units or not. Aftwards both players have to assign all their Leaders to fight with a certain Squad/Half Squad (or decide to let them fight on their own) and commit their decision with the Lock SMC button. Once this has been done the Attacker choses one of the Close Combat locations and starts to re-arrange the group assignments to his liking. After Attacker has commited his attacks the Defender does the same. When the Defender also has commited his attacks the Close Combat attack is resolved. If units are in Melee each player can some or all of his units declare to withraw into an adjacent location which will be performed only after all attacks have been resolved. [Note that CC is not sequential in case of ambush so far]. Broken units in Melee must be designated for Withdrawel if possible.
A Close Combat which does not result in the elimination of all enemy units will become a Melee and is continued in the next Close Combat Phase.
Events
All actions taken by yourself or your opponent are summarized in an Event listed below the Events bar on the upper right hand side. New events are added to the end of the list. Close an event by clicking on the small x button or hit the Space bar to remove the topmost event. Jump to the location of the event in the map by clicking on the eye symbol or use the J key. All events get cleared automatically at the end of each phase.
Events with purely informational value are colored in white. Those in red are blocking events and usually will change the commands available in the Toolbar. They also might change the active player until certain actions have been taken. Examples are effective Sniper attacks and MF expenditure in the Movement Phase.
Concealment
Enemy Concealed Units are depicted with a question mark instead of the usual counter. During the Setup Phase players can explicitly conceal as many Units (stacks) as they have Concealment Points for a Setup Area. Units gain Concealment according to the rules automatically. Concealment loss might depend on temporarily revealing one of the opponents Units. An event will request this from the players. Dummy Units can also be created from Concealment Points. Please see above the section concerning Dummy Units in chapter How to issue commands. Concealed Units are not distinguishable from the Support Weapons they possess in the Counter Inspector (Support Weapons are not listed to the right hand side of a Unit, instead beneath them).
Hidden Units
[tbd]
Map & Counters
A counter or playing piece on the map can either be a Unit or a Weapon. There are special counters you usually cannot directly influence like map counters (for example smoke) or the sniper.
These are the names and concepts for all counters currently implemented:
- Counter
- Player Counter
- Unit
- Infantry
- Multi man counter (MMC)
- Squad
- Half squad
- Crew
- Single man counter (SMC)
- Leader
- Multi man counter (MMC)
- Cavalry (not yet)
- Dummy
- Infantry
- Sniper
- Weapon
- Gun
- Support Weapon
- Unit
- Map Counter
- Player Counter
Squad
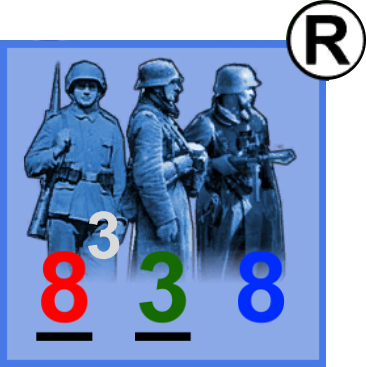
A squad is depicted above. It stands for roughly 10 men with their small arms. Its main properties are the fire power (FP, red), its firing range (green) and its morale (blue). The fire power can have a superscript white number standing for the capability to throw a smoke grenade. If the fire power is underscored this squad has a bonus of 1 FP in the Advancing Fire Phase. An underscored range factor means the squad does have the option to use Spraying Fire (you can target 2 adjacent locations when firing). The Report flag in the upper right hand corner will inform you about recent events concerning this unit (for example a morale check). It will be highlighted (yellow) if something new has happened. In the lower left hand corner there can be a number (0,1,2…) if the unit is in a building hex. It stands for the level of the location the unit is in (ground floor, first floor, second floor..). A squad has the capacity to carry 3 portage points without detrimental effects and can fire 1 Support Weapons together with its own FP or 2 by forfeiting its FP.
Half Squad
Half Squads are almost like squads. A counter will depict only 2 infantry men instead of 3. It stands for roughly 5 men. The portage capacity is reduced to 2 points. If it fires a Support Weapon it will lose its own FP.
Leaders
Leaders are depicted by a single man silhouette. They do not have any firepower by themselfes but provide a leadership modifier besides the morale. The lower the better (i.e. -2 is better than -1). The leadership modifier influences all kinds of actions of accompanying units (fire attacks, morale checks etc.). Leaders have a portage capacity of 1 and can lend this to an accompanying unit. They are granted 6 MF for movement purposes. Units moving together with them receive 2 additional MF (i.e. a squad gets 6 MF instead of 4). A leader can fire a machine gun with half its firepower.
Weapons
Weapons can either be Support Weapons or Guns.
Support Weapons
Support Weapons (SW) are possessed and carried around by infantry units. They comprise machine guns as well as small mortars or flamethrowers and demolition charges. Each SW weighs a certain ammount of Portage Points (PP) which is listed in the properties of that counter. For each PP in excess of the portage capacity of the carrying unit the unit suffers a MF malus of one. Units cannot rout with possessions weighing more than their portage capacity and will abandon any SW at that moment. Usage of SW differs for each type. Machine guns are fired by their owners, demolition charges can be thrown or placed. SW can breakdown (depending on their breakdown number) and subsequently be repaired (or destroyed in that attempt). Certain types of SW can be dismantled and thus carried around more easily (PP is reduced). It is possible to recover and possess SW of the enemy, but using them has some detrimental effects (increased breakdown chance).
Machine guns
Medium and heavy machine guns must be pointed in the general direction of the enemy and can continue to fire consecutive shots (for example in case of multiple rate of fire) only in that covered arc (of 60 degrees). Those machine guns also cannot be fired in the Advancing Fire Phase after they have been moved. All machine guns come with a ROF (multiple Rate of Fire) that determines whether they can shoot again after a fire attack. Machine guns can lay a Fire Lane during the enemy’s Movement Phase in conjunction with a Fire Fire attack. This Fire Lane leaves residual firepower in all hexes along the line of sight towards the target hex.
Guns
[tbd]
Various
Console
All Commands could also by typed into the Console on the lower right hand side of the screen and for certain functionality this is currently the only way to issue them (namely for the Map Editor and Scenario Editor, see below). The general syntax is:
Command doLog doSendOverNetwork doShowInLog parameter1 parameter2 …
See the complete list of Console commands available in another sticky post in the Help board [Incomplete at the moment].
Scenario logs
Logging your matches has become easier. You can now press the button Write Log … to start writing a log file of all commands. You should do this from a defined position – ususally once a match has been loaded from last autosave or last save and before(!) issuing other commands. Hit the Stop Log button in order to stop the logging. This is also automatically done if you Exit Play. You can then replay the match by pressing the Read Log … button. Make sure that the command index (number to the right of the turn display) is the same like it used to be when you’ve started to write the log. When a log is replayed not player interaction is possible anymore. Use the small dialog windows in the lower right corner of the screen to Pause, Stop or to set the speed of the log file replay.
Log files are stored in the folder
your installation directory/WW2T_Data/fileassets/logs
Log files will only work with the version they have been created with (the first line in the log mentions the version). There is two reasons for this: one is that the state all commands relate to still changes a lot between updates of WW2T. The other is that the sequence of commands only produces the same results if the random values generated by those commands are accessed exactly in the same order.
Chat
Open the Chat View (Shot Chat) in case it is minimized. Type your message for the other player.
Elo rating
All players start with 1000 Elo points after registration. On finishing a rated match their Elo score will automatically be updated. You Elo score can never be lower than 100.
This is the formula how your Elo rating will change after a match:
- EloValueHost = Elo score of host at match end
- EloValueGuest = Elo score of guest at match end
- ExpectedEloValueHost = 1 / (1 + 10EloValueGuest-EloValuehost)/400)
- ExpectedEloValueGuest = 1 / (1 +10EloValueHost-EloValueGuest)/400)
- ResultHost = 1 (if host won), 0 (if guest won)
- ResultGuest = 1 (if guest won), 0 (if host won)
- KHost = 40 (0-24 finished matches), 30 (25-49 finished matches), 20 (50-99 finished matches) or 10 (more than 100 finished matches)
- KGuest = 40 (0-24 finished matches), 30 (25-49 finished matches), 20 (50-99 finished matches) or 10 (more than 100 finished matches)
- NewEloValueHost = Ceil (EloValueHost + KHost * (ResultHost-ExpectedEloValueHost ))
- NewEloValueGuest = Ceil (EloValueGuest + KGuest * (ResultGuest-ExpectedEloValueGuest ))
Edit Map
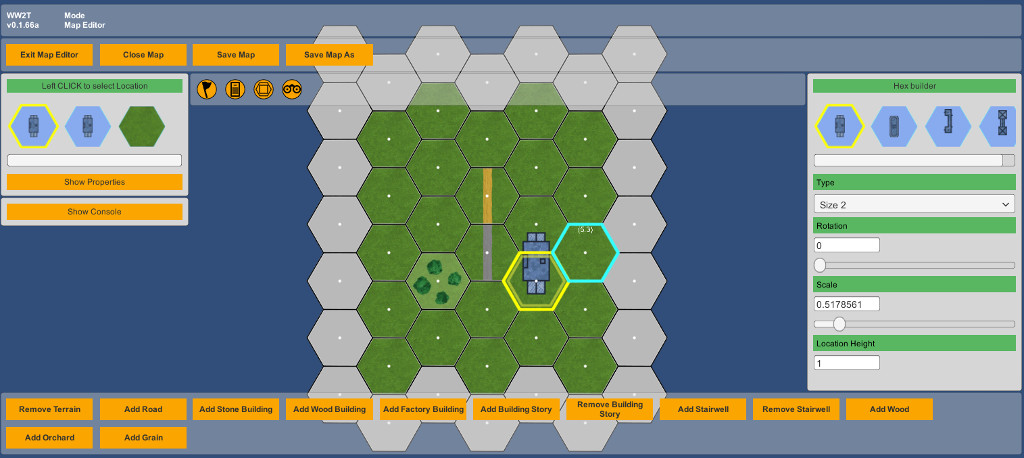
The map editor allows you to alter existing maps or create new ones. Be advised to save often and keep older versions of your map as a copy because the editor is not fail safe at the moment.
After entering the map editor (Edit Map) you can either load an existing map (Load Map) or create a new one (New Map). All maps are loaded from and saved into the maps directory. If you create a new map you have to enter the width and height in hexes of the new map. In addition to these dimensions there will be added one row/column of offboard hexes by default. Your map consists at the beginning of Open Ground (and those Offboard) hexes containing just one location. Select a hex in the map and see its locatios and properties in the upper left Hex Inspector (you might have to click on the Show Properties button to see the properties). Once a hex/location is selected the Command Bar will show all available commands. Some commands rely on the selection of the anchor location of a particular terrain. This is the location that was selected when the terrain has been added to the map. Select this location again if you want to remove a terrain feature or scale and rotate it. Use Save Map and Save Map As to save the map under the same name or a new name.
Commands
- Test LOS Lets you test the LOS between 2 locations, select first location and Shift-select a second location
- Remove Terrain Removes the terrain from the map.
- Add Roard Adds a road location. Choose between dirt and paved road (Type). Select variants of a type via Terrain Variant.
- Add Bridge A bridge currently must be placed on a hex containing a gully location. It is a special form of paved road.
- Add Stone Building Adds a stone building with one location. Select differently sized buildings via the Type. Select variants of a type via Terrain Variant.
- Add Wood Building Adds a wooden building with one location. Select differently sized buildings via the Type. Select variants of a type via Terrain Variant.
- Add Factory Building Adds a factory building to the map. Two types are available, one covering 9 hexes, the other 11 hexes.
- Add Rowhouse Building Rowhouses are special forms of Stone Buildings. They connect to other rowhouses but are in effect stand-alone buildings. Choose between 5 different variants to build different shapes.
- Add Building Story Add another vertical building location on the of the existing building in that hex. Check the overall obstacle height in the Hex Inspector properties as well as the different levels all vertical locations are on.
- Remove Building Story Remove the uppermost vertical building level [Not working with levels inbetween!]
- Add Stairwell Select 2 vertically adjacent building locations in one hex in order to add a stairwell that will allow units to move between those locations. Have a look at the Hex Inspector Has Stairwell Up/Down properties.
- Remove Stairwell Select 2 vertically adjacent building locations that are connected via stairwell in order to remove the stairwell.
- Add Wood Adds a Wood location to the selected hex. Choose between different variants.
- Add Orchard Adds a Orchard location to the selected hex.
- Add Grain Adds a grain location to the selected hex. Choose between different variants.
- Add Hedge select the hexside of a hex to add a hedge.
- Add Wall Select the hexside of a hex to place a wall.
- Add Gully Adds a Gully location to the selected hex (one level below ground). Choose between different variants.
Hex Builder
On the right hand side you can influence the terrain of the currently selected location in the following way.
Terrain variant
Some terrains are provided in different variants (for example buildings of one hex size). Select a variant by clicking on its depiction.
Terrain Type
Buildings come in different sizes, choose between smaller and bigger buildings
Rotation
Not all terrain types can be rotated. If the slider is interactable you can turn the terrain between 0 and 360 degrees. Some terrain types can be turned freely, some only in steps of 60 degrees because their rotation influences the hex sides of that hex. You can also enter a float value in the input field.
Scale
Scale the terrain so that it fits into the hexes (by default this is not always the case!). This way you can give similar buildings a slightly different appearance. You can also enter a float value in the input field.
Location height
This is only meant to be used for building locations. With this it is possible to change the height of a building location/story.
Edit Scenario
tbd